-
10 channels for FlySky FS-i6 radios
This news might be not super fresh, but somehow it missed my attention. There is a good news for all owners of FlySky FS-i6 radios: there is an unofficial firmware that turns this cheap 6 channel radio into 10 channel one. Of course, there is a small catch, or even a few of them:
- All 10 channels are available as PWM only using FS-ia10 receiver
- PPM on FS-ia6B is still only 6 channels wide. To have all 10, iBus connection to flight controller or iBus to PPM converter required
- PPM output still only on FA-ia6B and FS-ia10 receivers. No support for FS-ia6 RX module

New firmware, as well as few additional mods, is available on GitHub. I did not checked that, since I no longer own FS-i6 radio, but I've read good oppinions: it is stable and functional. So, who will give it a try?
Read more... -
iNav: Cleanflight learned how to do missions
In my recent post I mentioned that iNav flight controller software (fork of Cleanflight) introduced missions. Missions are preprogrammed waypoints that drone will fly to in specified order and/or do specified action at each of them. For example, if pilot wants to make a video on specified route, he does not have to pilot his drone all the time. He enters waypoints and lets machine do everything else. In this entry I will show how to configure iNav to do missions.
Requirements
- iNav compatible drone flight controller flashed with iNav software. Currently supported boards are: Naze32, Flip32, CC3D, SPracingF3, Sparky, RDMO
- GPS module connected to flight controller board. This example shows how to do it for Flip32, but it will work for all other boards, only UART pins might be different
- Magnetometer connected and properly calibrated
- Barometer connected
- EZ-GUI Ground Station Android application that will act as Mission Planner. Official Cleanflight Configurator does not support this function yet
- Bluetooth telemetry. Some time ago I have written how to do it for Flip32, but it will work almost the same for all other flight controllers, only UART pins might be different
-
Better GPS for Cleanflight: iNav
Cleanflight is an awesome piece of software for STM32 based flight controllers. But Cleanflight has one very serious flaw that makes its usage on bigger drones at least problematic. Cleanflight sucks in GPS and barometer support. Sucks a lot. It can handle Position Hold (somehow), Return To Home (barely) and Altitude Hold (oh man, up and down, up and down) but if you at least one tried that, you should know that is not only not reliable, but also not precise and hard to tune. Personally I gave up after few tires. It was not worth it. Comparing to Pixhawk (not talking even about Naza) it might as well not exists at all. But it has changed recently.... Read more...
-
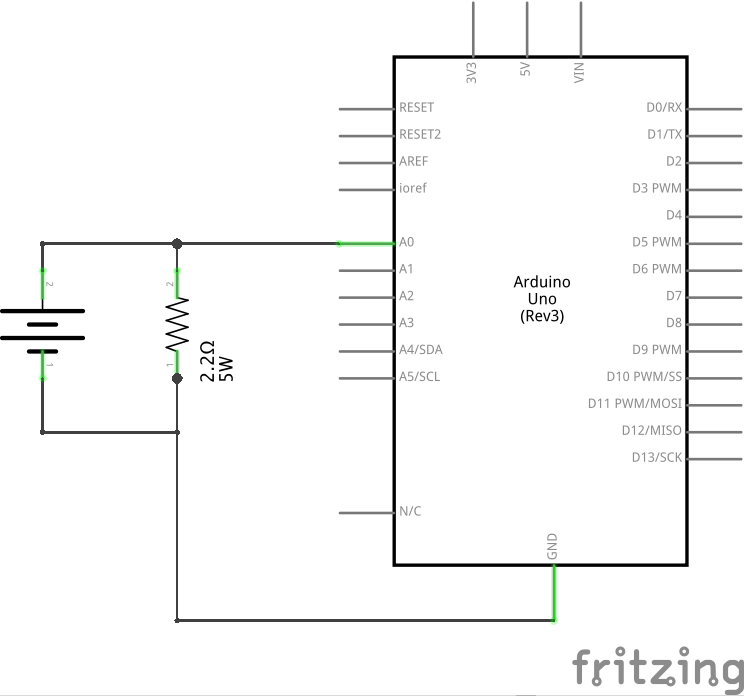
How to measure battery capacity with Arduino
Battery capacity measurement can be useful in many situations. And it is not hard, only requires enough time to discharge battery completely with know resistance and a way to measure voltage in the circuit. Ohm's law will to the rest:
I = U / RLet's say, we want to measure standard AA 1.5V alkaline battery capacity. Why 1.5V? They are common, made by many manufacturers and sold for different prices. And not always more expensive is better. To do this, we will need:
- AA 1.5V battery
- resistor to discharge it. We need high current to discharge battery in reasonable time, so low resistance is suggested. On the other hand, high current means o lot of heat, so we need a resistor that can survive this. I suggest using 2.2Ohm 5W ceramic resistors.
- Arduino to measure voltage in circuit. Any Arduino or plain ATmega or ATtiny with A/D converter will do.
So, first a simple electrical circuit:
And some code that will be run every second:
voltage = 5.0 * ((float) analogRead(V_METER)) / 1024.0;

float current = voltage / R_LOAD;
joules += voltage * current;
float wattHours = (joules / 3600.0) * 1000.0;
And here how it work:
- We need to measure voltage in circuit. This is why, in first step, we read 10bit A/D converter and scale output to 5V. Why 5V? Arduino Uno works on 5V, and it is the reference voltage here,
- Next, lets compute current using Ohm's law
I = U/R, - With know current current we can compute work using
P = U * Iand store it in joules variable, - Last step is to change joules to Watt hours.
If instead of Watt hours we want Ampere hours, there is no need to count joules. Instead of that, sum current and final value divide by 3600 (there are 3600 seconds in one hour). Like this:
voltage = 5.0 * ((float) analogRead(V_METER)) / 1024.0;

float current = voltage / R_LOAD;
ampereSeconds += current;
float ampereHours = ampereSeconds / 3600.0;
Full code is available here
Notes
- this circuit allows to measure batteries with voltage up to 5V. Anything above it will damage A/D converter
- to measure higher voltages, voltage divider will be required
- with higher voltage, power loss on resistor will increase. It will get very hot and might burn
-
Improve Boscam BOS 600 cooling with thermopad
Boscam BOS 600 is a 5.8GHz 600mW 32 channel video transmitter well suited for long range (> 1km) FPV flights. Its design makes the whole casing a radiator. This is good, since 600mW of RF means a lot of heat. Unfortunately, Boscams BOS 600 design has a serious bug there: so what if whole casing can act as a radiator, since connection between RF module and casing is poor? Just look at picture below.

RF chip is not even touching casing, gap is filled with a blob of thermal compound. Add far from perfect quality control and you will have overheating transmitter that will loose output power or even burn. But it can be fixed with a small piece of 2mm thick thermopad.
- Open casing by removing 4 screws on the sides of transmitter
- Clean RF chip and casing from existing thermal compound
- Cut a pice of thermopad similar in size to metal block screwed to bottom part of casing
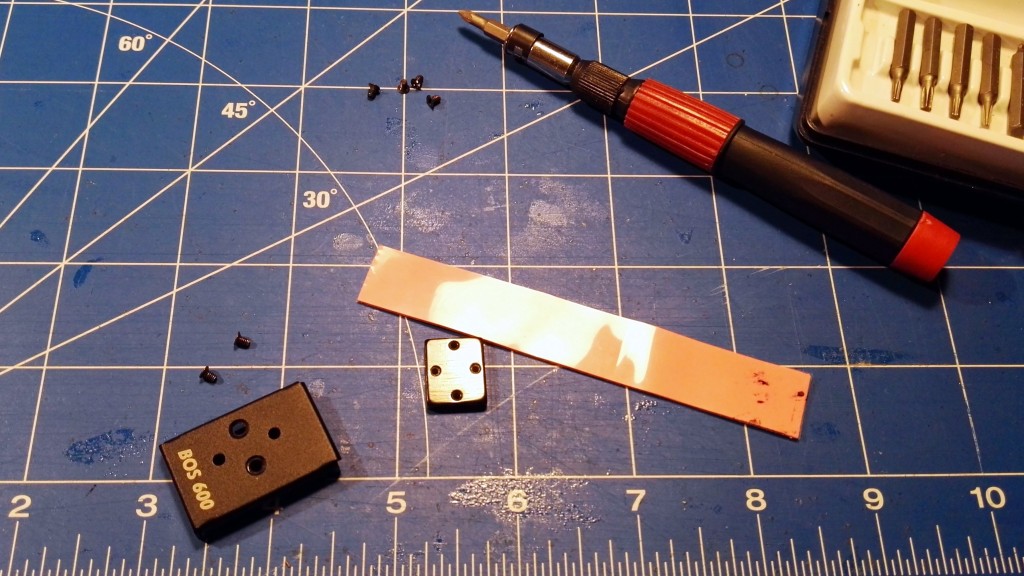
- Remove protective film from thermopad and put it in metal block

- Assemble whole unit and screw both parts together. Thermopad will tightly fit the gap between RF chip and casing, making heat transfer easier
- As a final touch I have added an additional aluminium radiator that I've bought for my Rasperry Pis. But this is not needed, and can be skipped

Final note of thermopads. They come in different thicknesses. 1mm and 2mm should be fine for DIY projects, and can be bought cheap from eBay or any other internet store. Strip big enough to improve dozen of BOS 600 transmitters should cost not more than few dollars or euros.
Read more... -
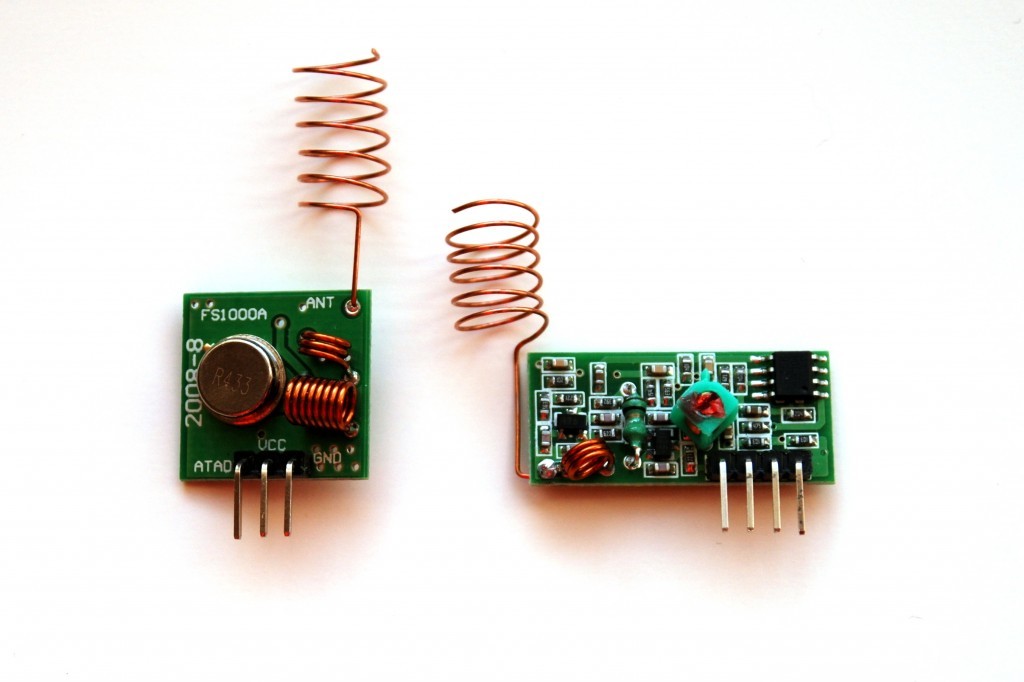
VirtualWire support for Raspberry Pi
FS1000A and XY-MK-5V 433MHz RF modules are very often first choice for cheap and dirty Do It Yourself wireless communication. Pair of those , allowing one way radio communication, const less than 3 dollars or euros. So they are really cheap. Limited range and transmission speed limits their real life usage, but simple assembly and extremely easy programming are additional advantage over more complex solutions. Specially in Arduino world, with VirtualWire library. I will not write about it right now, there is enough on the internet already.
-
Smartport telemetry for Cleanflight
With their latest transmitters and receivers FrSky changed telemetry protocol. XJT module, Taranis radios, X8R, X4R and X4RSB are using SmartPort telemetry protocol. And that creates few problems. First of all, SmartPort is a serial protocol. That means, flight controller has to have free serial port to connect S.Port device. Second of all, TX and RX lines shares the same wire. The work in half-duplex mode. Third of all, SmartPort signal levels are inverted: logical 0 is in HIGH state, logical 1 is in high state. All of that combined, connecting SmartPort receiver to flight controller and sending telemetry data is not so easy to archive. Specially on FCs without hardware inverters. That applies to most popular STM32F1 devices like Naze32 and Flip32. Not only numer of UARTs there is limited, but also they lack hardare inverters. Of curse, everything is possible and hardware solution for Cleanflight, Naze32 and SmartPort telemetry can be found here.
Luckily, there is simpler solution for Cleanflight that uses SoftSerial and does not require any hardware hacks besides special wire. Requirements:
- Cleanflight capable flight controller (STM32F1 or STM32F3),
- SmartPort enabled receiver: FrSky X8R, X6R, X4R, X4RSB,
- Possibility to enable SoftSerial. Depending on FC type, different fetures like Parallel PWM, Sonar, LED Strip or Current Meter collides with SoftSerial functionality. Check documentation first. In case of Naze32/Flip32 WS2812b LED strips and Parallel PWM can not be used.
-
Cleanflight 1.12 released
3 days ago, new version of Cleanflight, STM32F1 and STM32F3 flight controller software has been released. I already wrote few words about it a month ago, but final list of changes and improvements is bigger. Main changes are:
- Looptime sync to gyro readouts, enabled by default (!),
- New task scheduler,
- Air Mode. Finally this awesome feature was merged from Betaflight. If you want to know more what Air Mode is, read this article,
- Failsafe improvements. And what more important, failsafe can now be configured via Cleanflight Configurator. It has its own tab. To use it you will need Cleanflight 1.12 and Configurator 1.2 or newer,
- MSP telemetry is gone. It's replaced with LTM telemetry. Important notice: it is not MSP protocol. Only MSP telemetry was removed, not MSP protocol,
- New hardware targets,
- Documentation improvements. OK, this is minor, but I had some input there, and I'm quite pride of it!
I did not installed Cleanflight 1.12 on any of my quads yet, so no idea how it behaves. But 3 days without a path means that there should be no problems. Full release notes are available here
Read more... -
LiPo on fire
It is true what internet writes: LiPo batteries can be dangerous. This is how ended one of my buddy's batteries during indoor FPV session. Small crash, 2 seconds later cloud of white smoke and flames.
Reason was pretty simple. During crash battery got loose and still spinning propeller has cut 2 cells. Good thing, besides dead LiPo, no damage. We were lucky enough to get that thing outside before it damaged quadcopter or got anything else on fire.
Read more...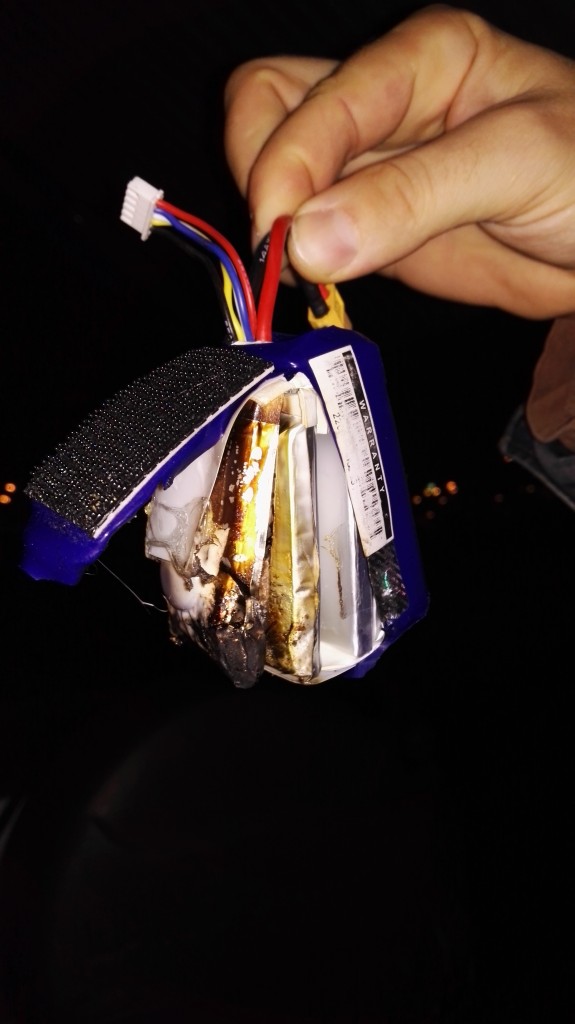
-
What is Betaflight Air Mode?
Better late than never, so here is mine explanation what is AirMode implemented in Cleanflights fork Betaflight and hopefully soon available also in Cleanflight. Before we will go to any details, please read this to understand how PID controller works. If you know, you might skip it.
In normal flight mode, No Air Mode, flight controller is not using I term from PID controller when throttle stick is low. Why? To make landing nice and easy. It zeroes it. If it would not do it, drone would want to fight pilot attempts to land. That makes sense, right? I term is also not desired during take off. Why? Gyro error might accumulate in I term even before drone takes off, that would result in spinning motors faster and faster (since machine can not correct anything while still on the ground) and in worst case scenario, drone might flip before going into the air. So, zeroing I term on low throttle is good. Or is it not?


I'm Paweł Spychalski and I do things. Mainly software development, FPV drones and amateur cinematography. Here are my YouTube channels: