-
How to flash MW OSD to Micro MinimOSD
While playing with newly arrived Micro MinimOSD and attempting to flash it with latest MW OSD software, I've discovered that offical tutorial, as well as many other are missing one tiny detail that makes whole process much harder than expected. In theory, MinimOSD just Arduino Pro Mini with additional hardware. So, in theory, you plug in your FTDI USB adapter and upload a sketch. But if you never worked with Arduino Pro Mini (like me, it was always Uno, Pro Micro, or barebone Atmega328) you might not know one detail. Yesterday it took me more than 30 minutes to figure out firmware upload is not working, while it should. So, another tutorial will be written.
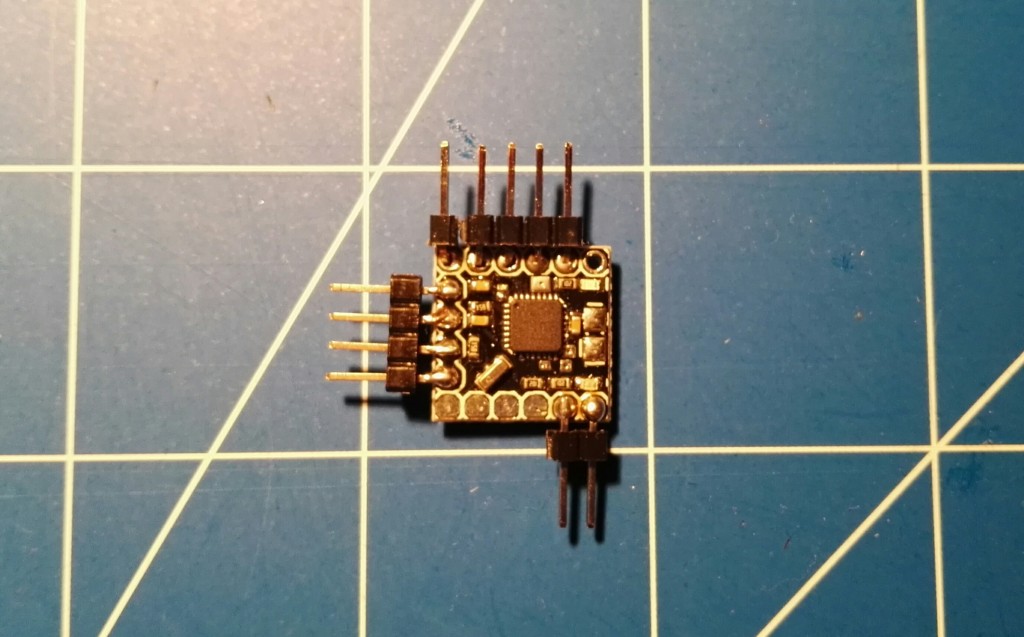
To flash MW OSD to Micro MinimOSD we will need:
- Micro MinimOSD with soldered pins, but isn't this obvious?
- USB to Serial cable adapter like FTDI FT232RL with drivers installed,
- MW OSD software downloaded,
- Arduino software,
- 5 female-to-female golpin wires,
-
Fix buzzer on Flip32
Buying cheap from China is like a lottery. Sometimes everything is fine, sometimes is not. For example, I will never again buy super motors and pellers. This just does not work. With electronics it is slightly better. Usually it works. But sometimes, well, it does not. And this might be a case for Flip32+ multirotor flight controllers from around June 2015 (give or take few weeks) v2.3_OEM RTF. In those FC, buzzer is not working when connected to designated pins.
Reason? Instead of 100Ohm SMD resistor in buzzer circuit, there is a capacitor. Solution is quite simple: replace capacitor with a resistor and fix manufacturing error.
What you will need, is a 0603 size 100R (100Ohm) SMD resistor and a (good) soldering iron. Position of faulty element is shown on a picture below.
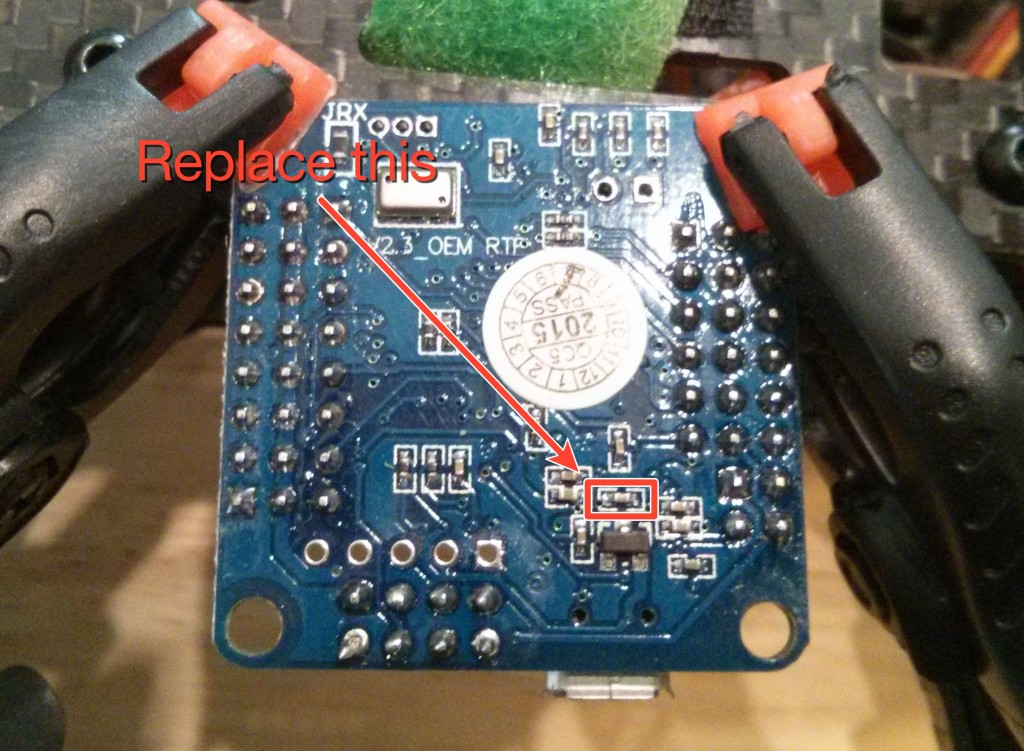
Today I've fixed two of mine Flip32 flight controllers and succeeded on both. 0603 size SMD are small, but big enough to do it at home. If your soldering iron has temperature setting, set it to 280-300C. If not, use one with about 20-25W. And sharp, good soldering tip of course. To remove old SMD element just heat it up about 1 second and push away with a tip of soldering iron. Apply some new solder to pads. Place new element on pads, push it carefully with a needle when needed. Heat it for a second and that is all. New SMD element should be soldered to pads and buzzer should be working like expected.
Read more... -
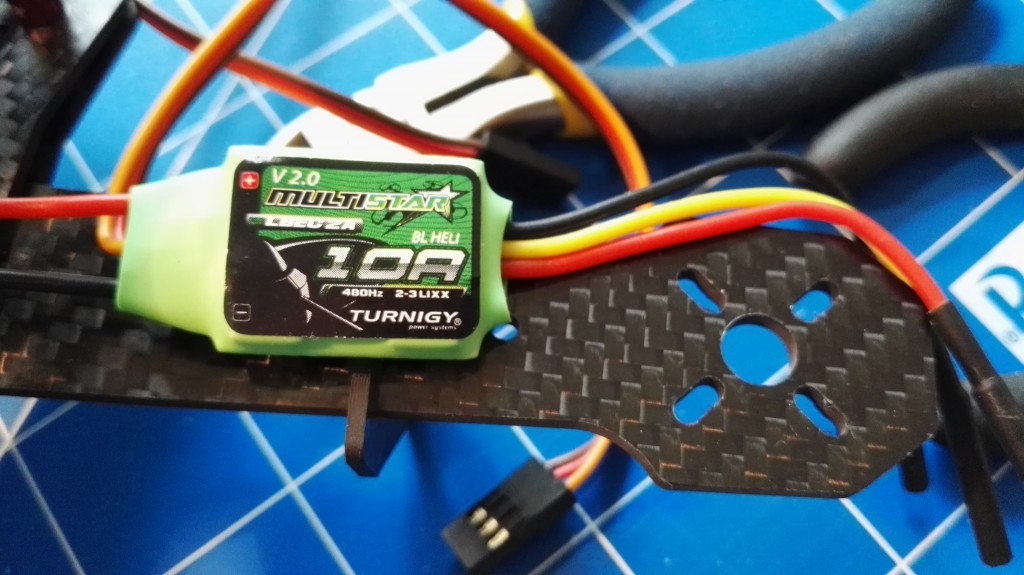
Let's build a FPV drone: motors and electronics
My 250 class quadcopter project is slowly coming to a successful (hopefully) end. Finally had some time to assemble motors and ESC.
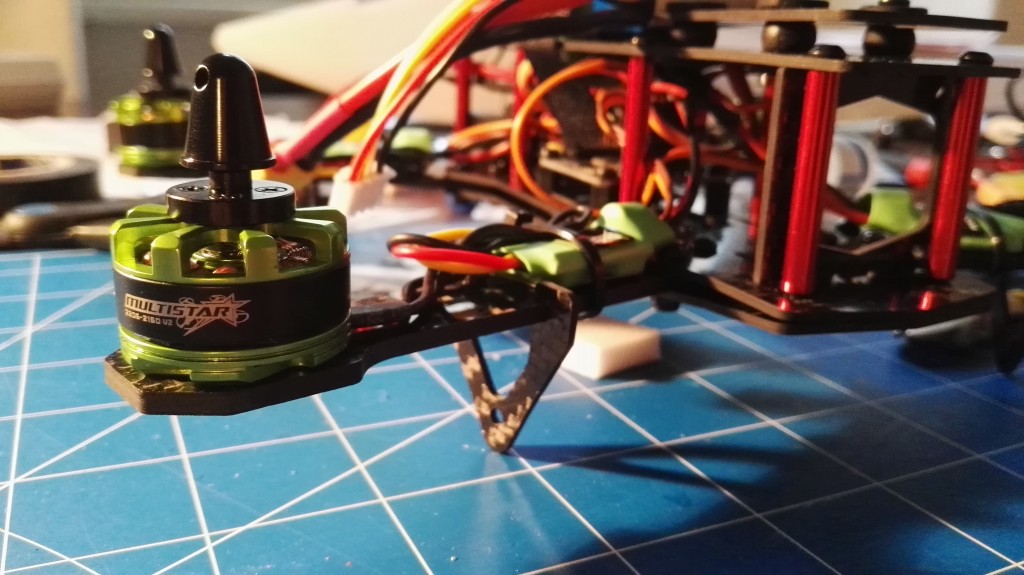
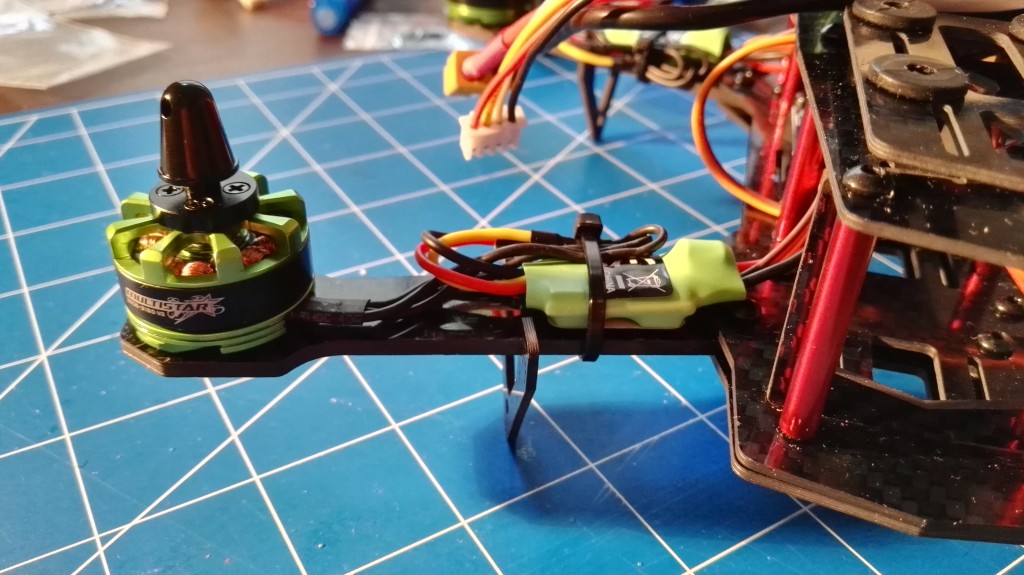
Since I wanted to have rather standard setup with 5x3 propellers, I had no super high demand on ESC, I've decided to use Turnigy Multistar 10A V2 ESC preflashed with BLHeli software available at Hobby King. Why them? Cheap, already flashed with BLHeli so no need to to flash at home and 10A is enough to drive 5x3 props. And it's also enough for 6x3. Just in case.
Motors are also Turnigy bought at Hobby King with 50% discount few months ago: Turnigy Multistar V2 2206 2150KV "Baby Beast". After discount they were super cheap: $7.5 apiece. And they are green, what goes nicely with carbon fiber ZMR250 frame.
Right now motors are not soldered directly to ESC, I've only removed 2mm bullet connectors from both motors and ESC. Waster on space. I'm still thinking about where to put those ESC, so for first few weeks there will be some extra cable between them. Later we will see.

Read more...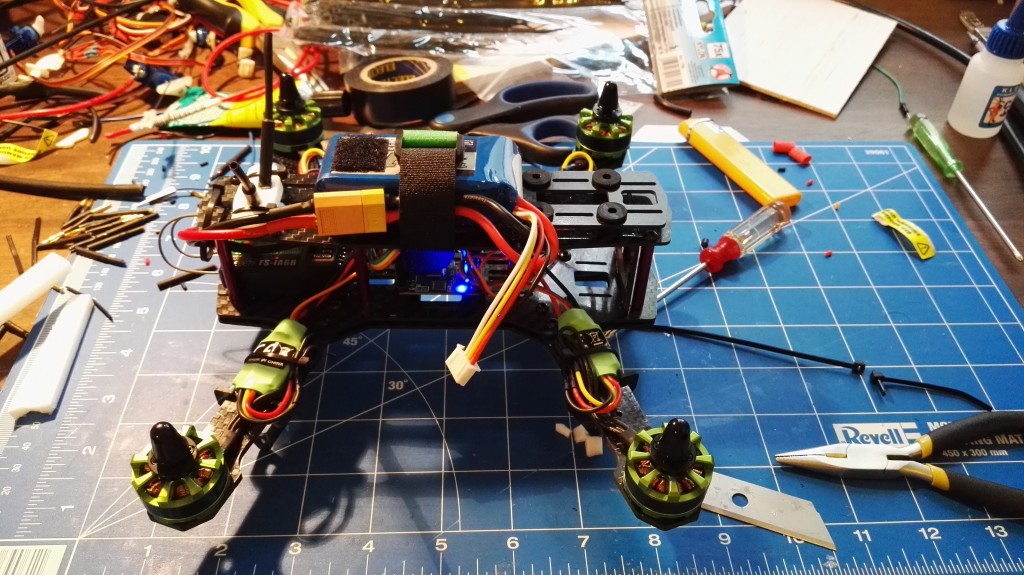
-
Let's build a FPV drone: frame assembly
Yesterday I finaly had some time to work on my 250 class quadcopter based on ZMR250 carbon fiber frame. There was a plan to finish it before weekend, but looks like plan will have to be changed. I'm missing motor screws. They were not with frame nor motors. Too bad...
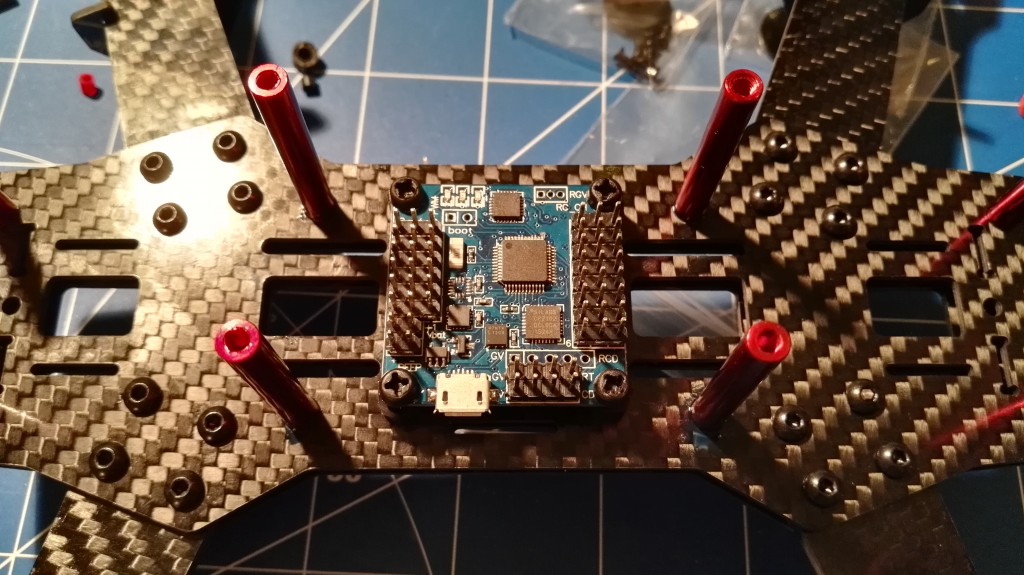

After one evening of work I've been able to assemble bottom plate with motor arms and attach Flip32+ flight controller to it. As you can see, Flip32 is rotated 90 degrees clockwise. USB port points left, not back. This allows much simpler access to USB port. On the other hand, it requires additional configuration entry that allows fllight controller software to compensate for that. But all in time.
One last remark: the frame, even without top plate is super stiff. Very good since it will take serious beating in next weeks. I'm finally learning to fly in Rate mode without auto-leveling. Boy, it's hard. After two 20 minutes sessions I'm able to make a turn...
Read more... -
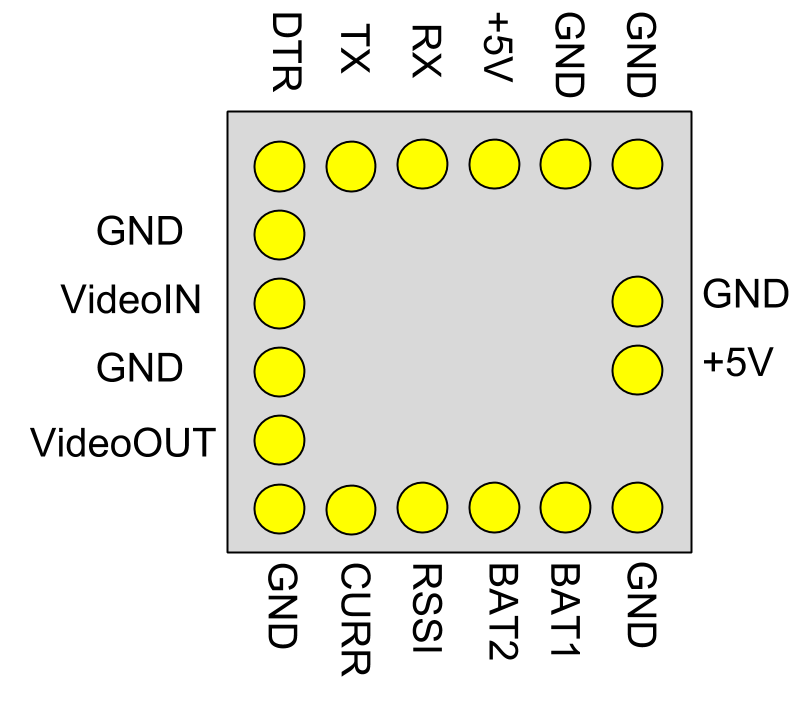
Adding GPS to Flip32+ and Cleanflight
Flip32 and Flip32+ (10 DOF version of Flip32 with built-in barometer and magnetometer) are nice little flight controllers. And cheap. Some call them clones of Naze32, but this is not completely true. Yes, they are very similar, share the same hardware, but they are not identical. I would say they are better than Naze32 since have more features and are easier to extend. But that is not the topic.
One of coolest features of every drone is GPS support. This allows for both Position Hold and even navigation support. I will not explain how to configure Position Hold and navigation on Flip32+ and Cleanfligh today. The reason is simple: I'm still trying to fully understand PID controllers used in those modes: Pos, PosR and NavR. And it is not going very well I must say. Position Hold in low wind is OK, but navigation and PH in wind conditions is unreliable and I'm still unable to configure it to work well. But GPS even without Position Hold has some use. For example, Home marker on OSD when flying FPV.
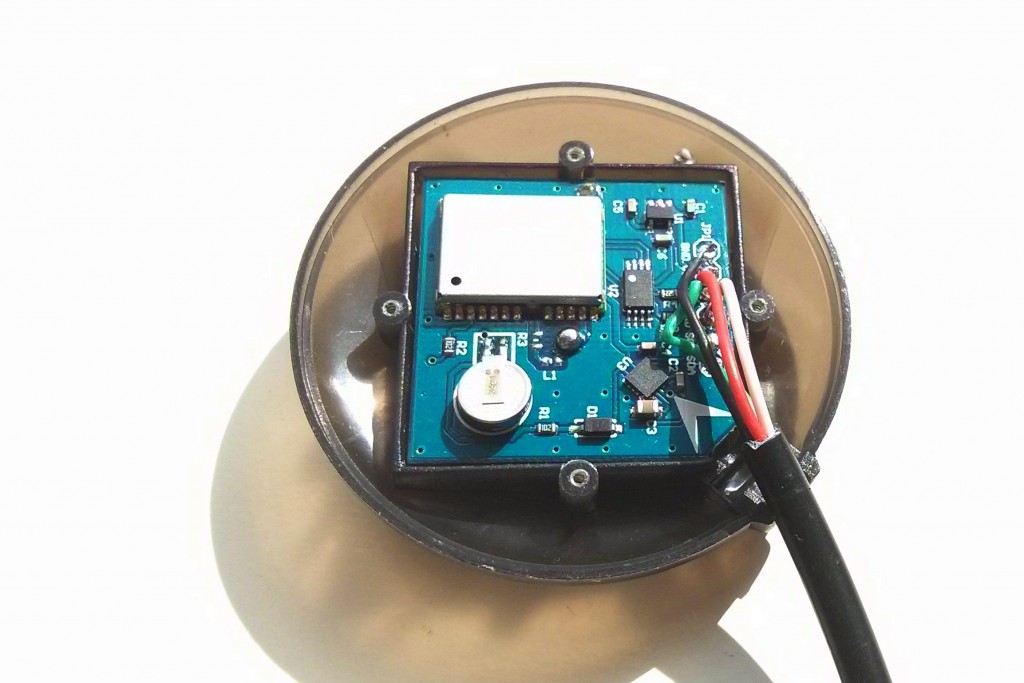 In this tutorial I will use Ublox Neo-6M GPS module, Flip32+ 10DOF and Cleanflight 1.9.0.
 -
Let's build a FPV drone: frame
Many say that small 250 class quadcopter are super fun. Small, fast, agile, tough and crash resistant. I've decided to check it out and build 250 quadcopter drone by myself. And next few posts will be tightly connected with this topic. Let's call it a build log.
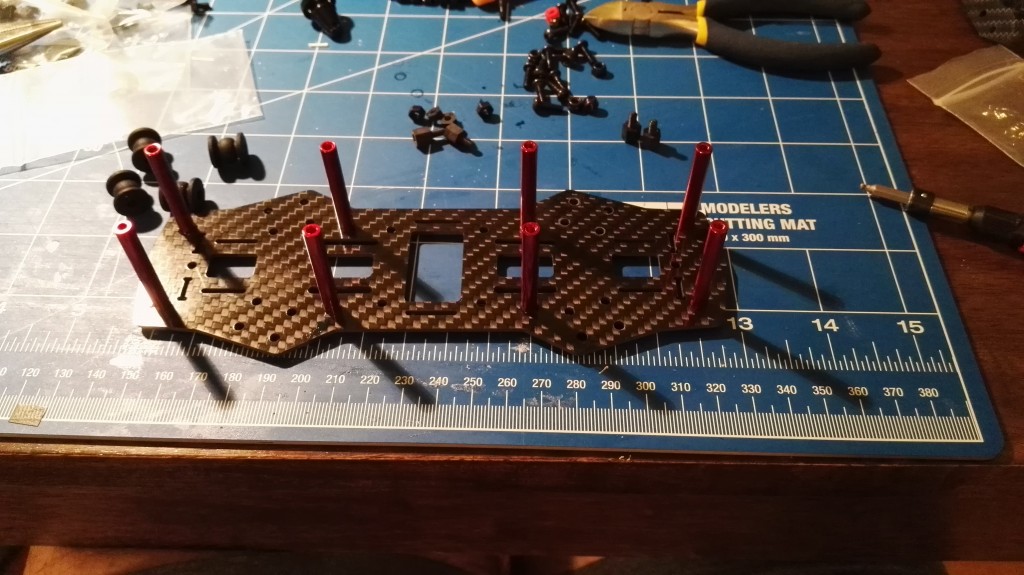
The most important part of every multirotor is a frame. It decides about everything. For my quad I've decided to use ZMR250 clone frame made from carbon fiber.
 There is also glass-fiber version of this frame, and it's half a price (below $20 while carbon is around $35). So, what do we get for additional $15? We get 2 good things, and one bad. But let's begin with good things:
- carbon fiber is lighter than glass fiber. My frame weights 145g while glass-fiber equivalent weights 181g. 36g might not seem much, but it is a difference after all. In my oppinion a difference worth $15,
- carbon fiber is more durable than glass fiber. At least in theory. So, in theory carbon fiber quadcopter frame should be harder to break during crashes. We will see.
An the bad thing? Well, carbon conducts electricity and can block radio waves. This means, that you have to be extra careful with all the cables and antenna placement. Insulate everything, never leave any cables touching the frame and antennas has to be placed as far from frame as possible. Some kind of mast would be recommended.
Read more... -
I have build a Depron plane...
How hard it is to build a RC plane without plans and starter kits? To do it in "Trust me, I'm an engineer" style. In mid June I've decided to give it a try and right now I can tell: it's hard, but not that hard as one might imagine. All the problems I've faced were faced previously by someone else. I only had to ask right questions, read a lot, and use engineering sens to make plane work.
And well, it works. Way better than I expected it might work. Look for yourself.

It even flies. See the maiden flight video.
-
Adding Bluetooth telemetry to Flip32+ and Cleanflight
When few weeks I wrote how to solve a problem of broken USB port in Flip32+ flight controller, I suggested that one of the solutions is adding a serial Bluetooth module to provide wireless connection with a bord. And telemetry. Excellent news is: this is pretty simple and cheap.
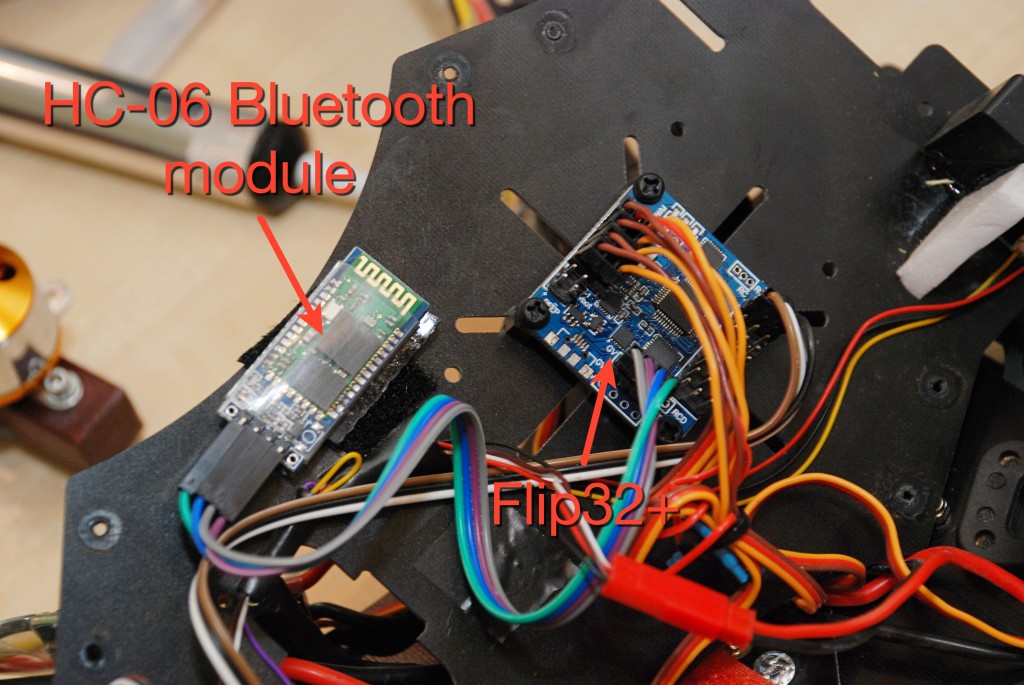
What we will need:
- Flight controller with soldered UART pins,
- HC-06 serial Bluetooth module, costs below $5 when imported from China,
- USB-to-serial module, for example FTDI FT232RL. This is needed to configure HC-06 to use 115200 port speed,
- 4 wire female-to-female golpin cable.
Read more... -
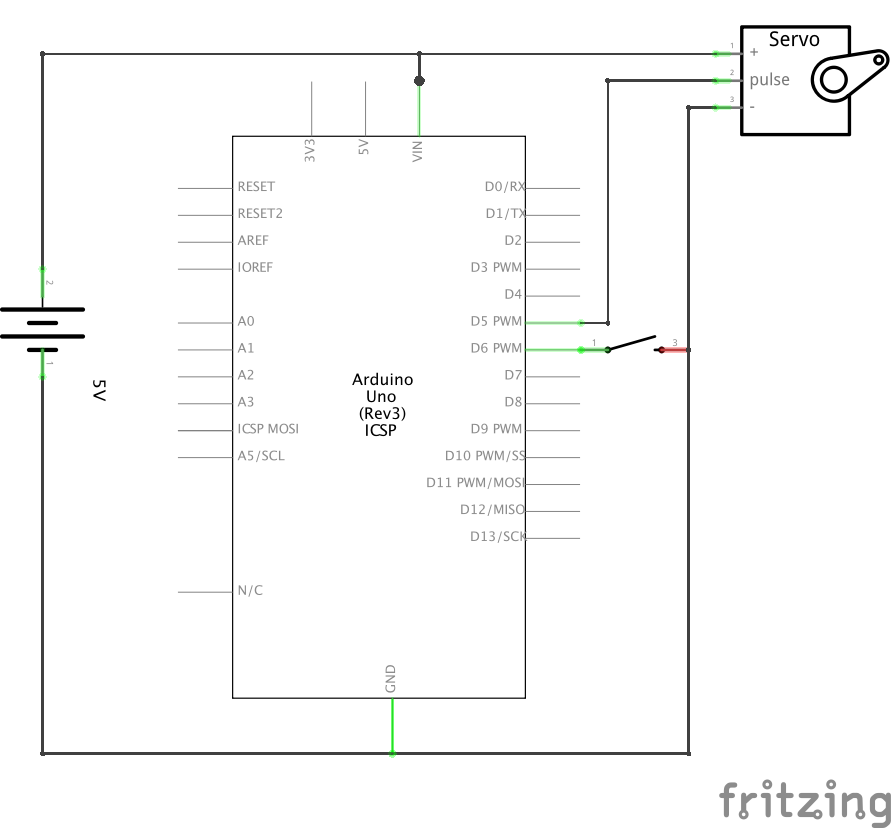
Simple servo tester with Arduino
Servo tester is a useful little device that is needed specially when you do not have one. I've been placed in a situation like that few days ago what I was trying to connect ailerons with servos on my Depron plane and setup correct control throw. Luckily, I own a few Arduinos, so 15 minutes later I owned a divice like that:

It is an extremely simple servo tester based on Arduino Pro Micoro that can send 3 different PWM pulse lengths: 1000us, 1500us and 2000us. That gives min, neutral and max stick position on RC radios. Perfect to setup control throws and neutral positions.
Required parts:
- Arduino. Any Arduino will do. I used Arduino Pro Micro, but any can be used. Even barebone ATmega328 running internal oscillator on 8MHz,
- Breadboard,
- Tact switch,
- Some golpins to make servo connector,
- Cables.
Electrical diagram goes as follows:
Program is also not complicated:
And at the end, it works like that:
Source code is available on GitHub.
Read more... -
Flip32 with broken USB port
Low price equals low quality. At least usually. I became clear to me (again) when I've broken USB port on my Flip32+ multirotor flight controller. I've pulled USB cable and USB socket stayed on a plug. Cheap solder. Or too quick soldering. No idea. Bottom line: unable to connect to flight controller board using USB cable. To make things worse, quadcopter was not tuned yet. It was flying, but not in the way I wanted it to.
What are the options in this case? Well, there are 3:
- get new flight controller board. Quite expensive since the only thing that is broken is USB port itself. Everything else works just fine,
- resolder USB socket. Might be the best solution, but since it's surface mounted micro USB, it's way above my soldering skills. THT? Why no prob. Simple SMD like resistor? Why not. More advanced? No...,
- use different way to communicate with flight controller.
I've chosen the third way. Flip32 (and Naze32) has build in hardware UART ports (as well as SoftwareSerial) that can be used to establish connection with a PC. Software like Cleanflight already allows you to use any serial port to talk to flight controller. Read more...


I'm Paweł Spychalski and I do things. Mainly software development, FPV drones and amateur cinematography. Here are my YouTube channels: